Integration of 3D Models with CesiumLab
During the process of a rooftop photovoltaic project, it was found that rooftop inspection is a troublesome task. It requires manual measurement on the roof, which is inefficient and poses safety risks. The dimensions measured manually are prone to errors, and the varying quality of personnel can lead to incomprehensible sketches, causing significant problems in the design process. Therefore, using drones for surveying is essential, and finally, the 3D models obtained from the survey are displayed on the web through CesiumLab.
I. Introduction to CesiumLab
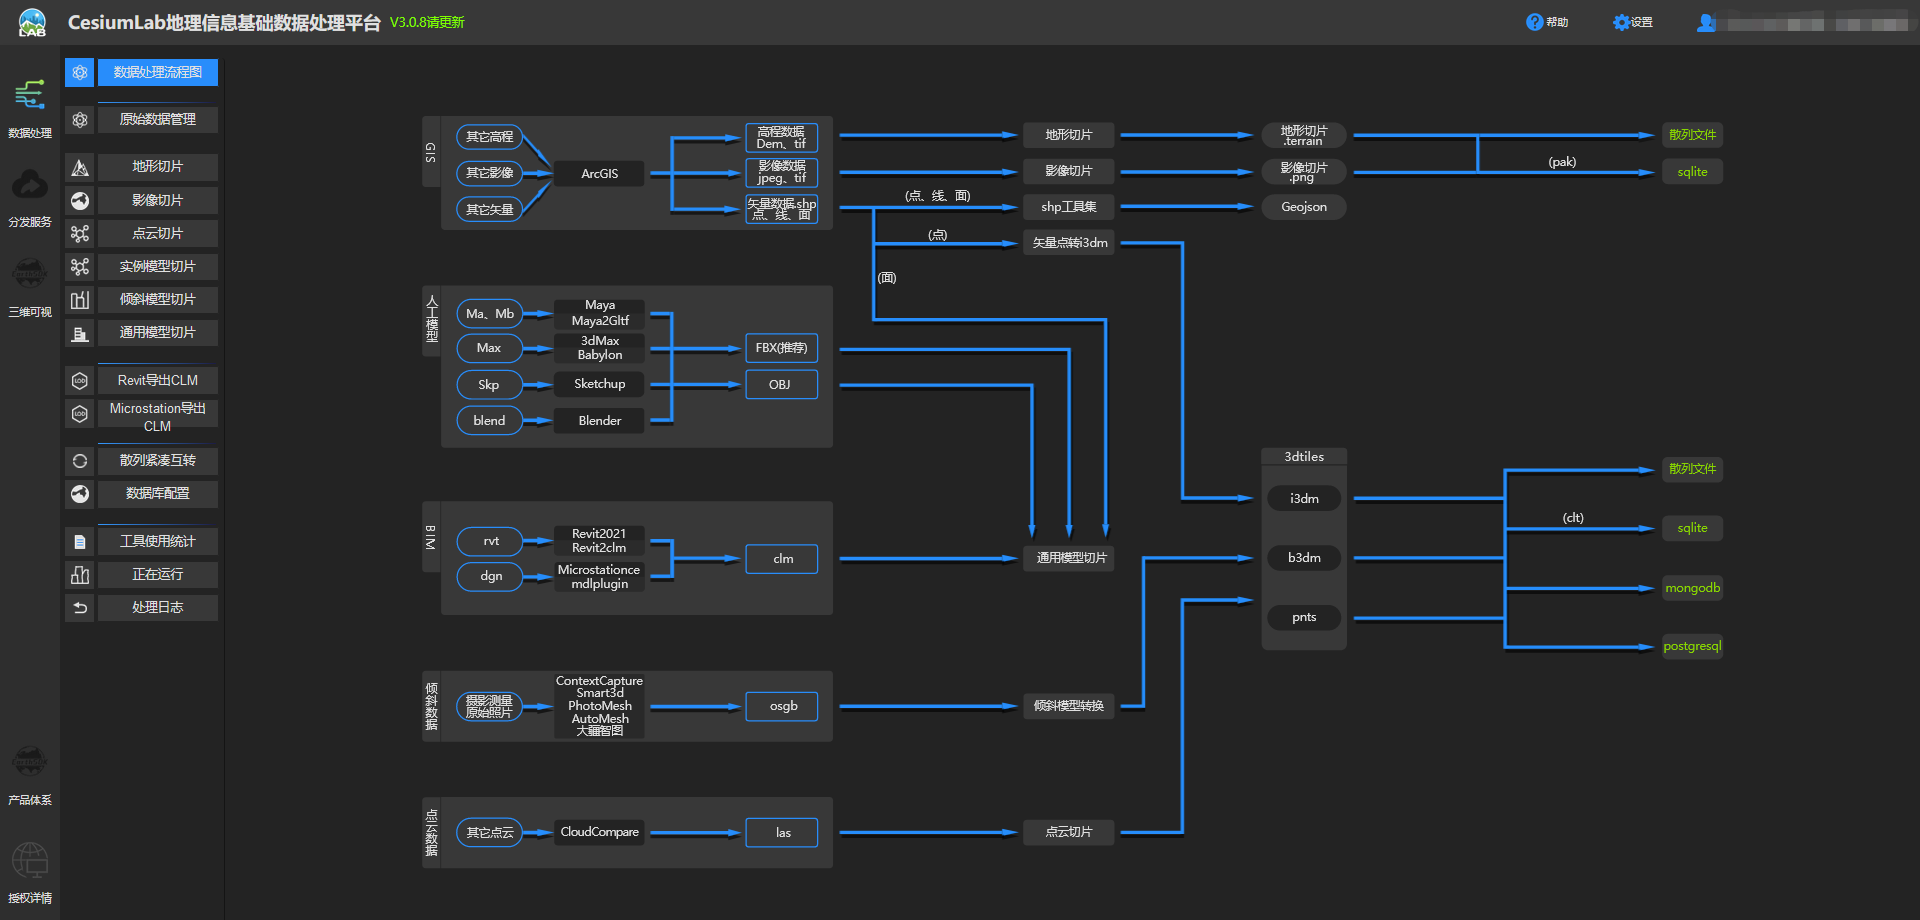
Currently, there are open-source 3D visualization platforms such as Cesium, Unreal Engine, and OsgEarth. Open-source HTTP data services include tomcat, nginx, etc. However, there is almost no complete open-source product for data preprocessing, which is where CesiumLab comes into play. CesiumLab is positioned as a complete and easy-to-use data preprocessing toolkit around the Cesium platform, and it already includes a lightweight, high-performance HTTP distribution service that can be started and used immediately, as well as integrating our another product, EarthSDK, as a data preview tool. Therefore, the entire functionality of CesiumLab consists of three major parts:
-
Data preprocessing, including tools for terrain, imagery, models, vectors, oblique, BIM, point clouds, etc.
-
Distribution services, including imagery tile services, terrain tile services, 3dtiles tile services, etc.
-
EarthSDK preview page, used to integrate 3D scenes based on EarthSDK.
II. Installation and Use of CesiumLab
- Download CesiumLab from the official website and install it on your local computer. After installation, the software’s usage page will pop up in the browser. It is recommended to use Google Chrome as the default browser.
- Register and log in to CesiumLab. In the data processing interface, preprocess the data. You can convert other formats of 3D data into 3dtiles data. For specific usage methods, refer to the official documentation by clicking the help button in the taskbar.
III. Uploading 3D Data
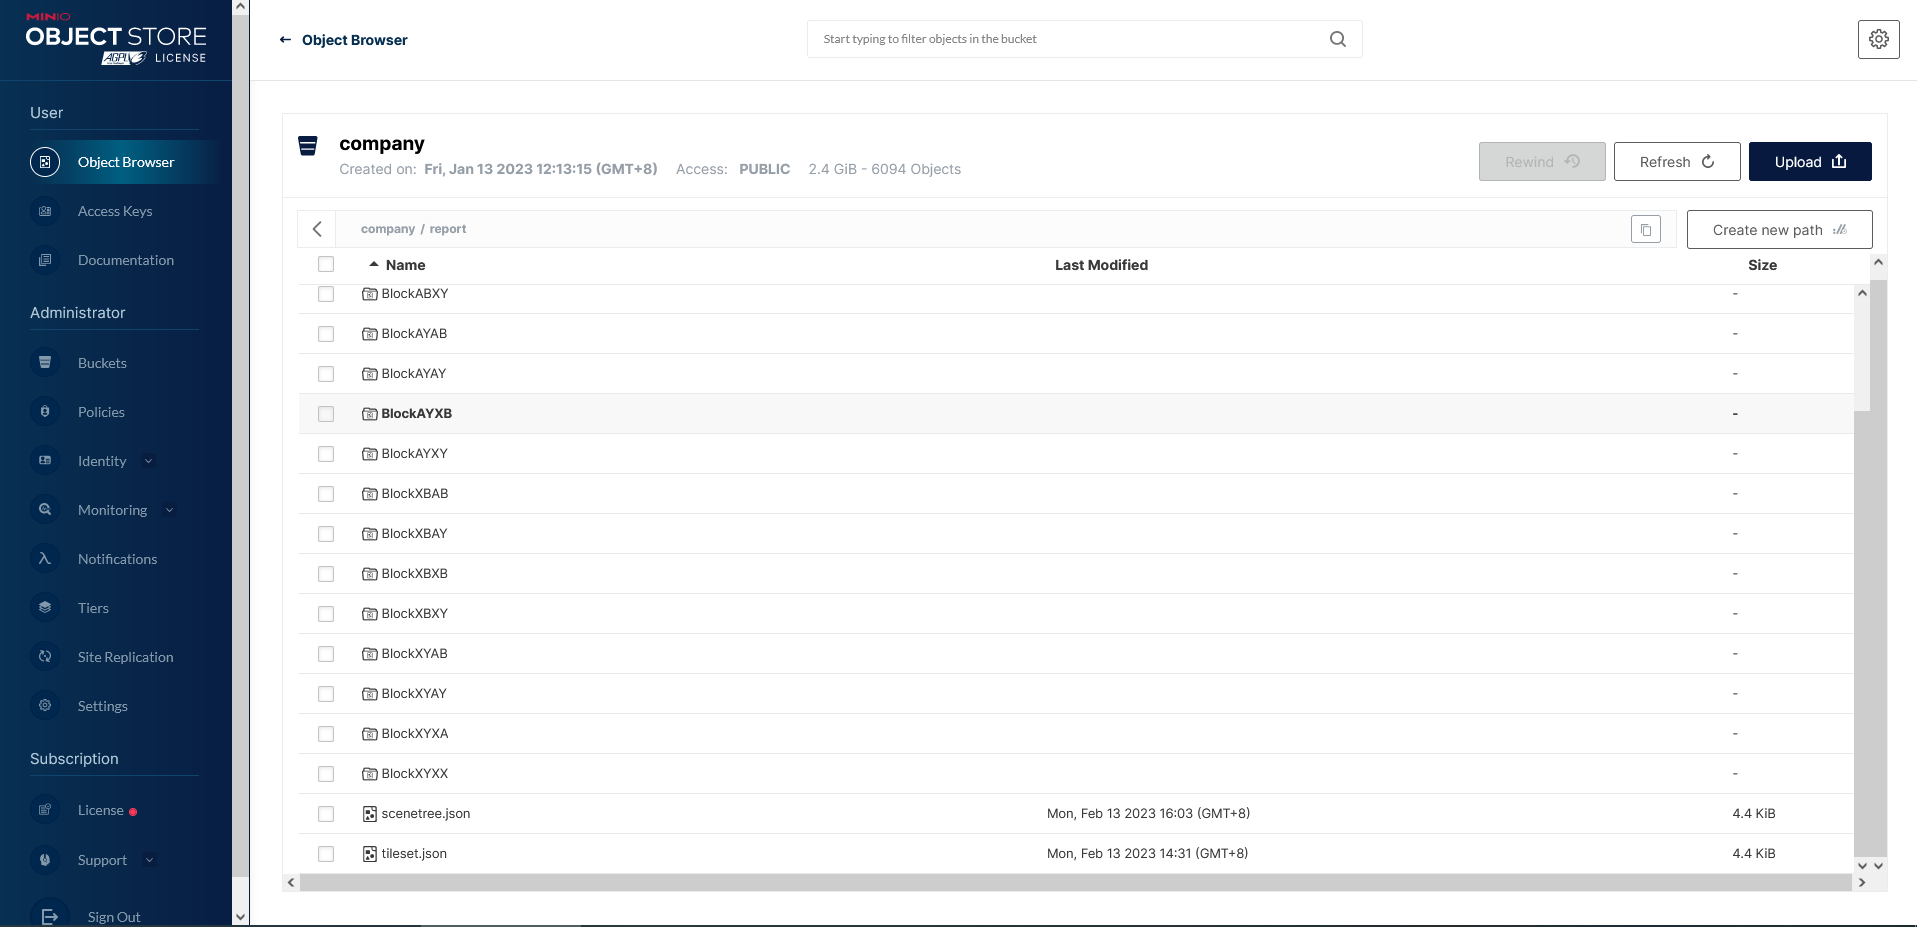
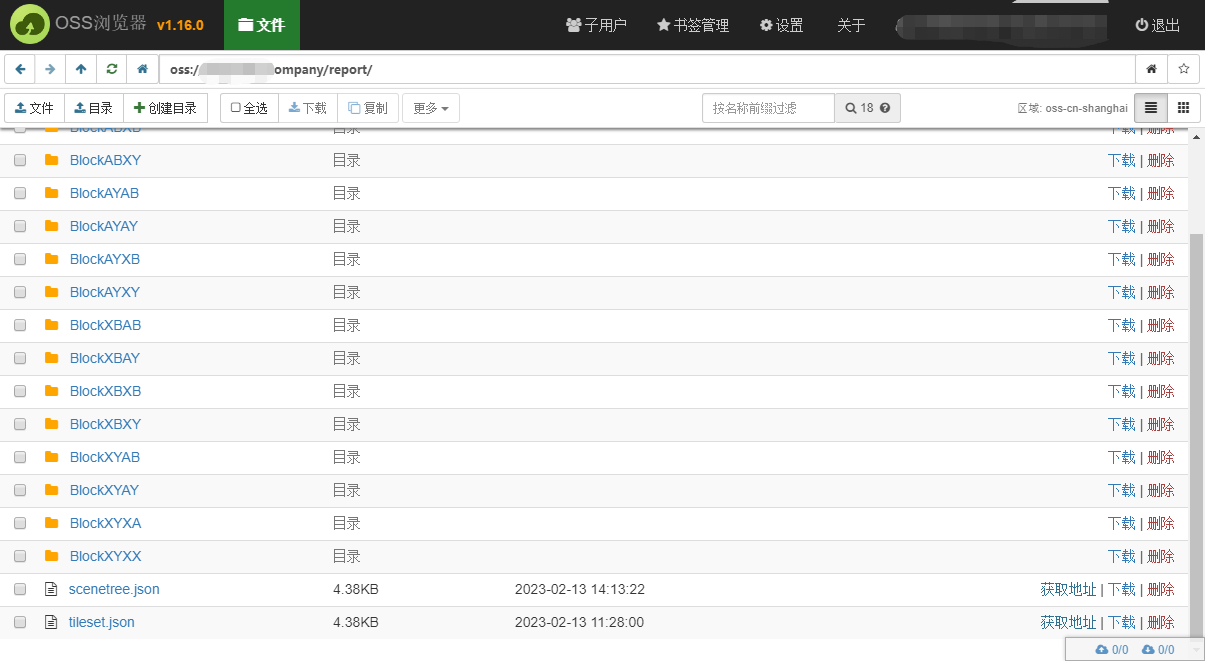
The built-in distribution service of CesiumLab was not used because the project is ultimately deployed on the public network. Therefore, the file server is used as the storage location for the project for unified maintenance and management. You can upload to the MINIO file server or Alibaba Cloud OSS file server. For specific upload operations, you can search on Baidu.
Note: The file server needs to enable the download function, i.e., files can be accessed directly through the browser. In MINIO, you need to configure and enable downloads through mc, and in Alibaba Cloud OSS, you need to enable ACL permissions.
- Uploading files to the MINIO file server
- Uploading files to the Alibaba Cloud OSS file server
IV. Integrating EarthSDK in the Project
EarthSDK is an open-source, free 3D map secondary development package based on Cesium produced by the CesiumLab laboratory, adding many practical functions to the features of Cesium.
- Measurement: Includes point, distance, height, area, volume, excavation calculations, etc.
- Analysis: Includes visibility, model flattening (excavation), video fusion, model slicing, terrain hole digging, water reflection, etc.
- Effects: Includes shadows, glow, ambient occlusion, depth of field, outlines, night vision, limiting light direction, full-screen brightness adjustment, etc.
- Animation: Includes path animation, camera follow, scan lines, OD lines, etc.
- Plotting: Includes conventional point-line-plane annotations, various arrow marks, and a military annotation library, etc.
For building a project based on Vue2, you can click Reference Blog and follow the configuration in the blog. Note that in the index.html, you need to include the js:
<!-- Using EarthSDK for development -->
<script src="./js/XbsjEarth/XbsjEarth.js"></script>
<script src="./js/XbsjEarthUI/xbsj.js"></script>
When using EarthUI in the project, you must include xbsj.js and XbsjEarth.js. The specific component coding is:
<template>
  <div style="width: 100%; height: 100%">
    <div ref="earthContainer" style="width: 100%; height: 100%">
    </div>
  </div>
</template>

<script>
  export default {
    name: "EarthComp",
    data() {
      return {
        _earth: null, // Note: Earth and Cesium-related variables in vue must use an underscore as the prefix!
        _disposers:null,
        _tileset:null,
      };
    },
    // 1.1 Resource Loading
    mounted() {
      this.initEarth();

    },
    methods:{
      initEarth(){
        XbsjEarthUI.create("app").then(earthUI => {
          // Note: Configuring using earthUI.earth.sceneTree in this way will not take effect
          earthUI.earth.xbsjFromJSON({
            "sceneTree": {
              "root": {
                "children": [
                  {
                    "czmObject": {
                      "xbsjType": "Tileset",
                      "xbsjGuid": "3f0f663c-969e-435c-8f9d-d6e9a88637c1",
                      "name": "report",
                      "url": "http://192.168.1.100:9000/company/report/tileset.json",
                      "xbsjClippingPlanes": {},
                      "xbsjCustomShader": {}
                    }
                  }
                ]
              }
            },
            "cameraViewManager": {
              "lastView": {
                "position": [
                  2.0325835657412252,
                  0.6961622952277993,
                  1516.2813055917127
                ],
                "rotation": [
                  5.950795411990839e-14,
                  -0.7856327871041935,
                  6.283185307179586
                ],
                "fov": 1.0471975511965976,
                "near": 0.1,
                "far": 10000000000
              }
            }
          });
          //earthUI.earth.sceneTree.$refs.viewshed.czmObject.flyTo();

          window.uia = earthUI;
        });
      },
    },
    // 1.2 Resource Destruction
    beforeDestroy() {
      // When the vue program is destroyed, related resources need to be cleaned up
      this._disposers.forEach(d => d());
      this._disposers.length = 0;
      this._earth = this._earth && this._earth.destroy();
    },
  }
</script>

<style scoped>

</style>
V. Project Deployment
Deploy the project to the public network by following the normal deployment process. Place the compiled dist file in the html directory of nginx to complete the nginx deployment.
Note: Cross-domain issues often arise during project deployment. My solution is to resolve cross-domain issues through nginx. The specific configuration is as follows:
 server {
                listen       80;
                server_name  127.0.0.1;

                # Backend service configuration, with this location you can access through http://domain/jeecg-boot/xxxx
                location ^~ /company {
                        # Using MINIO server
                        #proxy_pass               http://ip:9000/company/;
                        # Using Alibaba Cloud OSS, note that the trailing / should not be included
                        proxy_pass               https://domain/company;

                }
                # Solve the problem that the page cannot be found when refreshing the route address in Router(mode: 'history') mode
                location / {
                        root   html/dist;
                        index  index.html index.htm;
                        if (!-e $request_filename) {
                                rewrite ^(.*)$ /index.html?s=$1 last;
                                break;
                        }
                }
        }
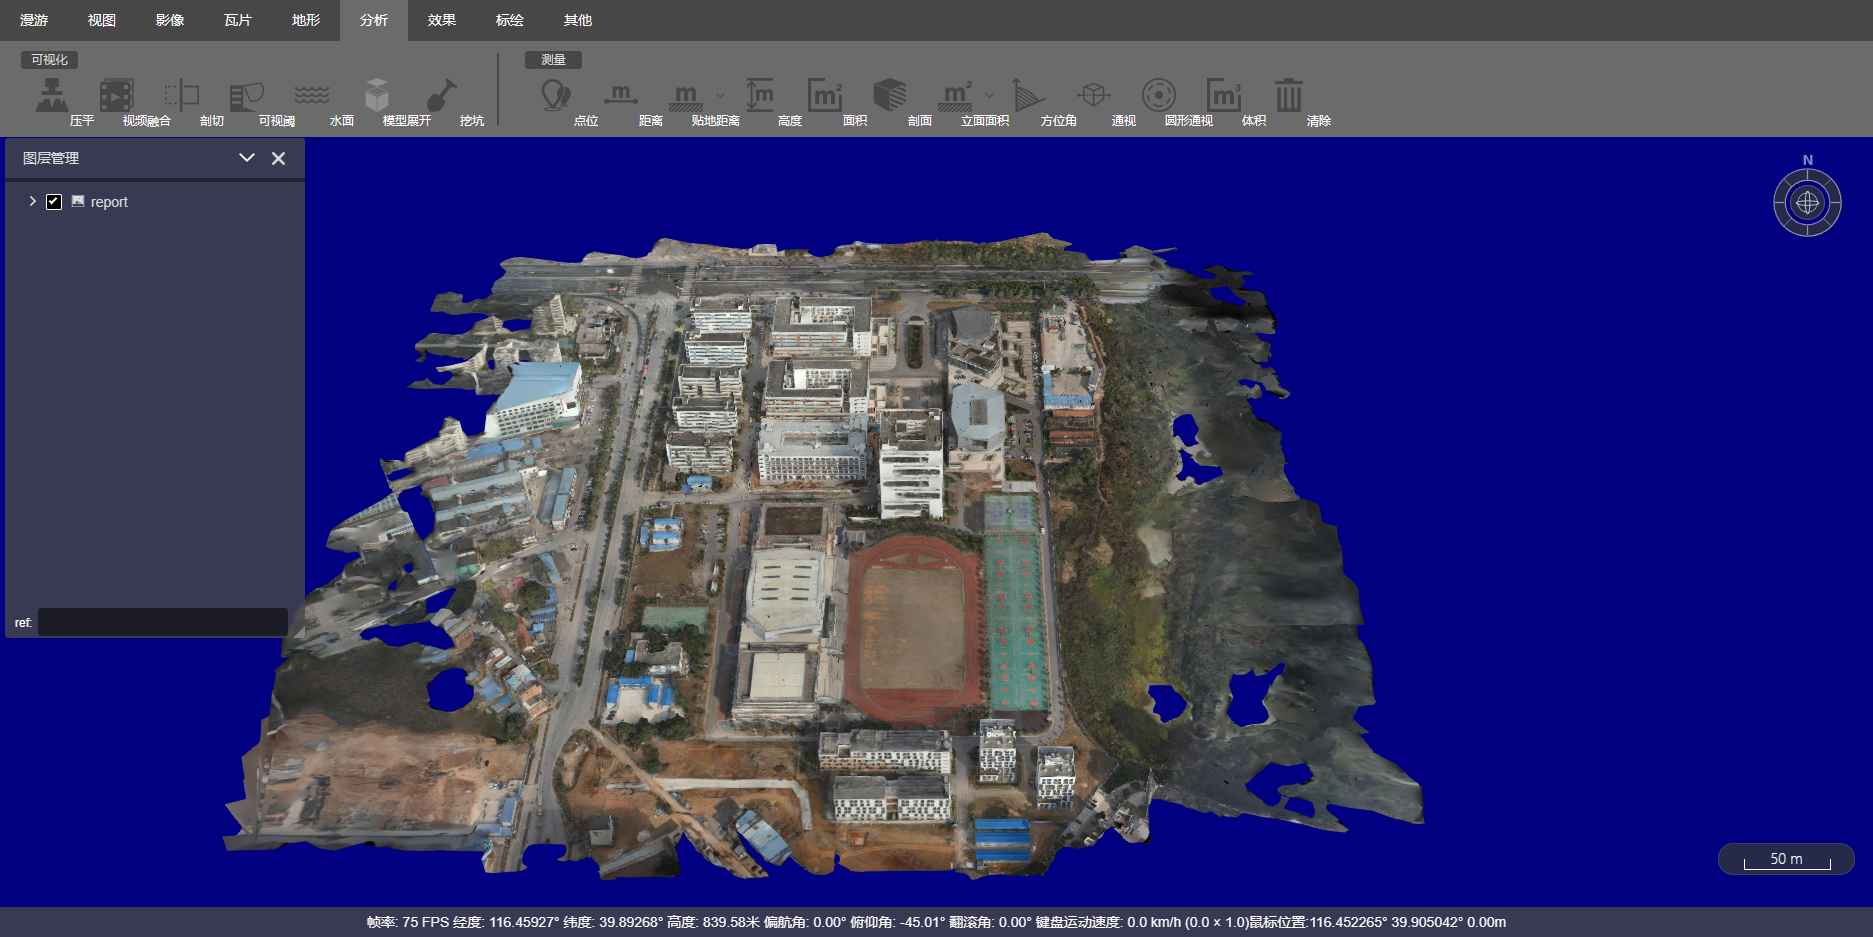
VI. Project Effects