Initial Environment Setup for Ubuntu
This article mainly focuses on setting up the startup environment for jeecg-boot on a brand new Ubuntu system. The main software to be installed includes:
- jdk8 and above
- redis
- mysql5.7 or mariadb10.3
- nginx
- ssh
- rxtx
After installing the environment, you also need to upload the backend jar package and the frontend dist folder, and then start the project.
1. Configure Mirror Source
There are two ways to configure the mirror source, the common one is by modifying the configuration file, and the other is by configuring the mirror source through the desktop version system via
1. Change Source by Modifying Configuration File
# Backup configuration file
sudo cp /etc/apt/sources.list /etc/apt/sources.list.bak
# Modify configuration file
sudo vi /etc/apt/sources.list

# Edit file, add mirror source
# USTC Mirror Source
deb https://mirrors.ustc.edu.cn/ubuntu/ impish main restricted universe multiverse
deb-src https://mirrors.ustc.edu.cn/ubuntu/ impish main restricted universe multiverse

deb https://mirrors.ustc.edu.cn/ubuntu/ impish-updates main restricted universe multiverse
deb-src https://mirrors.ustc.edu.cn/ubuntu/ impish-updates main restricted universe multiverse

deb https://mirrors.ustc.edu.cn/ubuntu/ impish-backports main restricted universe multiverse
deb-src https://mirrors.ustc.edu.cn/ubuntu/ impish-backports main restricted universe multiverse

deb https://mirrors.ustc.edu.cn/ubuntu/ impish-security main restricted universe multiverse
deb-src https://mirrors.ustc.edu.cn/ubuntu/ impish-security main restricted universe multiverse

deb https://mirrors.ustc.edu.cn/ubuntu/ impish-proposed main restricted universe multiverse
deb-src https://mirrors.ustc.edu.cn/ubuntu/ impish-proposed main restricted universe multiverse

# Tsinghua Mirror Source
deb https://mirrors.tuna.tsinghua.edu.cn/ubuntu/ impish main restricted universe multiverse
deb-src https://mirrors.tuna.tsinghua.edu.cn/ubuntu/ impish main restricted universe multiverse

deb https://mirrors.tuna.tsinghua.edu.cn/ubuntu/ impish-updates main restricted universe multiverse
deb-src https://mirrors.tuna.tsinghua.edu.cn/ubuntu/ impish-updates main restricted universe multiverse

deb https://mirrors.tuna.tsinghua.edu.cn/ubuntu/ impish-backports main restricted universe multiverse
deb-src https://mirrors.tuna.tsinghua.edu.cn/ubuntu/ impish-backports main restricted universe multiverse

deb https://mirrors.tuna.tsinghua.edu.cn/ubuntu/ impish-security main restricted universe multiverse
deb-src https://mirrors.tuna.tsinghua.edu.cn/ubuntu/ impish-security main restricted universe multiverse

deb https://mirrors.tuna.tsinghua.edu.cn/ubuntu/ impish-proposed main restricted universe multiverse
deb-src https://mirrors.tuna.tsinghua.edu.cn/ubuntu/ impish-proposed main restricted universe multiverse

# Alibaba Mirror Source
deb http://mirrors.aliyun.com/ubuntu/ impish main restricted universe multiverse
deb-src http://mirrors.aliyun.com/ubuntu/ impish main restricted universe multiverse

deb http://mirrors.aliyun.com/ubuntu/ impish-security main restricted universe multiverse
deb-src http://mirrors.aliyun.com/ubuntu/ impish-security main restricted universe multiverse

deb http://mirrors.aliyun.com/ubuntu/ impish-updates main restricted universe multiverse
deb-src http://mirrors.aliyun.com/ubuntu/ impish-updates main restricted universe multiverse

deb http://mirrors.aliyun.com/ubuntu/ impish-proposed main restricted universe multiverse
deb-src http://mirrors.aliyun.com/ubuntu/ impish-proposed main restricted universe multiverse

deb http://mirrors.aliyun.com/ubuntu/ impish-backports main restricted universe multiverse
deb-src http://mirrors.aliyun.com/ubuntu/ impish-backports main restricted universe multiverse

# 163 Mirror Source
deb http://mirrors.163.com/ubuntu/ impish main restricted universe multiverse
deb-src http://mirrors.163.com/ubuntu/ impish main restricted universe multiverse

deb http://mirrors.163.com/ubuntu/ impish-security main restricted universe multiverse
deb-src http://mirrors.163.com/ubuntu/ impish-security main restricted universe multiverse

deb http://mirrors.163.com/ubuntu/ impish-updates main restricted universe multiverse
deb-src http://mirrors.163.com/ubuntu/ impish-updates main restricted universe multiverse

deb http://mirrors.163.com/ubuntu/ impish-proposed main restricted universe multiverse
deb-src http://mirrors.163.com/ubuntu/ impish-proposed main restricted universe multiverse

deb http://mirrors.163.com/ubuntu/ impish-backports main restricted universe multiverse
deb-src http://mirrors.163.com/ubuntu/ impish-backports main restricted universe multiverse
Note: Change the system code to the current system code

# Refresh list and take effect
sudo apt-get update
sudo apt-get upgrade
2. Modify Source via Desktop Configuration
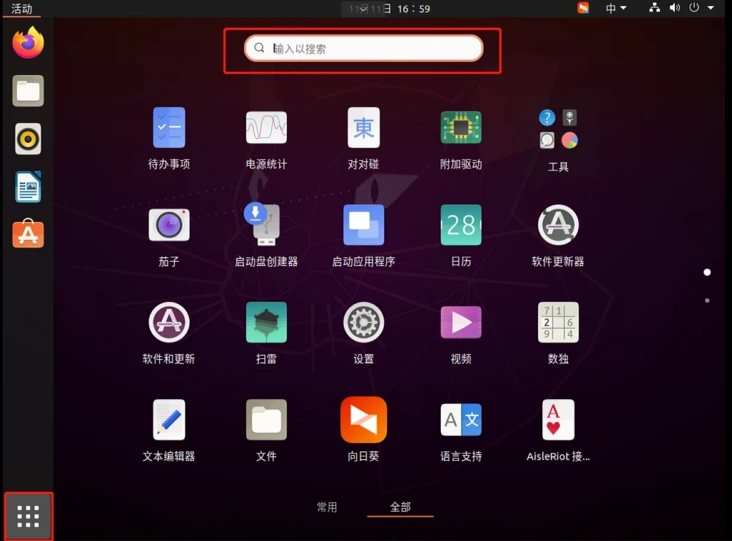
In Ubuntu 20.04.3 desktop version, click the bottom left “Show Applications”, search for “Software & Updates”, and click to enter.
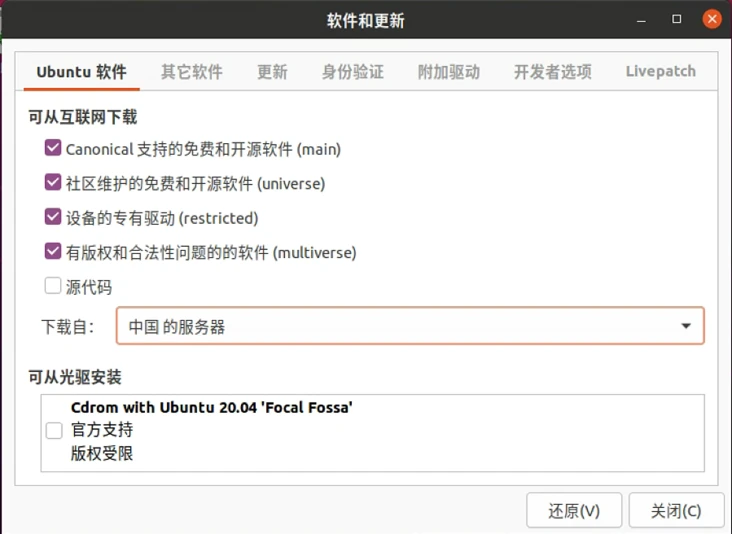
In the “Software & Updates” interface, under the “Ubuntu Software” section, select “Other” from the “Download from” dropdown menu.
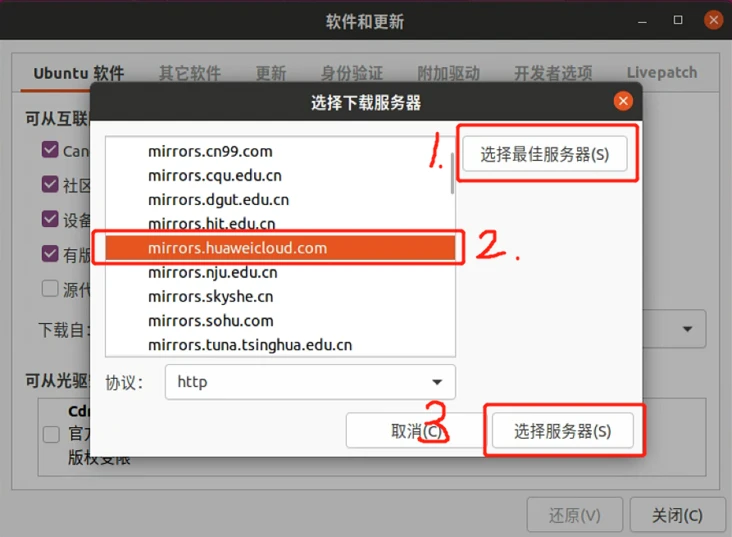
Then click “Select Best Server”, the system will automatically test the download servers, wait for a while, select the mirror server provided by the system, and the software source modification is complete.
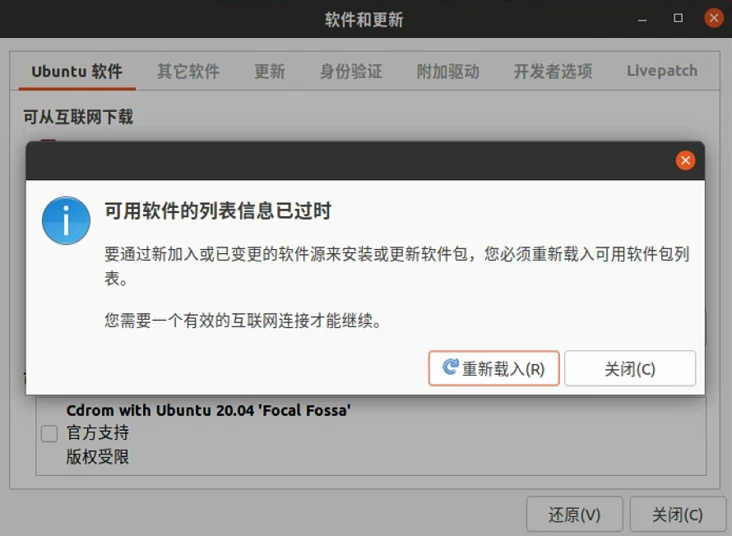
Close the “Software & Updates” interface, the system prompts “The list of available software information is outdated”, click “Reload” to proceed.
The above are the two ways to configure the mirror source.
Reference Blog: Two Methods to Change Source in Ubuntu 20.04 Desktop
2. Install JDK
JDK can be installed online or locally. It is recommended to install online if there is a network connection, by executing commands. Without a network, you can only install locally using a tar package. Here, only the online installation method is shown, installing JDK version openjdk8.
# Find a suitable JDK version
sudo apt-cache search openjdk
Entering this command will yield many versions
openjdk-8-jdk - OpenJDK Development Kit (JDK)
openjdk-8-jdk-headless - OpenJDK Development Kit (JDK) (headless)
openjdk-8-jre-headless - OpenJDK Java runtime, using Hotspot JIT (headless)
openjdk-8-jre-zero - Alternative JVM for OpenJDK, using Zero/Shark
openjdk-8-source - OpenJDK Development Kit (JDK) source files
openjdk-11-jdk - OpenJDK Development Kit (JDK)
openjdk-11-jdk-headless - OpenJDK Development Kit (JDK) (headless)
openjdk-11-jre-headless - OpenJDK Java runtime, using Hotspot JIT (headless)
openjdk-11-source - OpenJDK Development Kit (JDK) source files
openjdk-13-jdk-headless - OpenJDK Development Kit (JDK) (headless)
openjdk-13-jre - OpenJDK Java runtime, using Hotspot JIT
openjdk-13-jre-headless - OpenJDK Java runtime, using Hotspot JIT (headless)
openjdk-13-jre-zero - Alternative JVM for OpenJDK, using Zero
openjdk-13-source - OpenJDK Development Kit (JDK) source files
openjdk-16-jdk - OpenJDK Development Kit (JDK)
openjdk-16-jdk-headless - OpenJDK Development Kit (JDK) (headless)
openjdk-16-jre - OpenJDK Java runtime, using Hotspot JIT
openjdk-16-jre-headless - OpenJDK Java runtime, using Hotspot JIT (headless)
openjdk-16-jre-zero - Alternative JVM for OpenJDK, using Zero
openjdk-16-source - OpenJDK Development Kit (JDK) source files
openjdk-17-doc - OpenJDK Development Kit (JDK) documentation
openjdk-17-jdk - OpenJDK Development Kit (JDK)
openjdk-17-jdk-headless - OpenJDK Development Kit (JDK) (headless)
openjdk-17-jre - OpenJDK Java runtime, using Hotspot JIT
openjdk-17-jre-headless - OpenJDK Java runtime, using Hotspot JIT (headless)
openjdk-17-jre-zero - Alternative JVM for OpenJDK, using Zero
openjdk-17-source - OpenJDK Development Kit (JDK) source files
1. Install JDK
sudo apt-get install openjdk-8-jdk
2. Add Environment Variables
vim ~/.bashrc

# Add the following line at the end
export JAVA_HOME=/usr/lib/jvm/java-8-openjdk-amd64
export PATH=$JAVA_HOME/bin:$PATH
export CLASSPATH=.:$JAVA_HOME/lib/dt.jar:$JAVA_HOME/lib/tools.jar
3. Verify Successful Installation
java -version

# If the following output appears, the installation is successful
openjdk version "1.8.0_91"
OpenJDK Runtime Environment (build 1.8.0_91-8u91-b14-0ubuntu4~15.10.1-b14)
OpenJDK Server VM (build 25.91-b14, mixed mode)
Reference Blogs:
Two Ways to Install JDK on Ubuntu
Ubuntu JDK Installation Tutorial
3. Install MYSQL
For some unknown reasons, there are no MySQL mirrors found in all current mirror sources, suggesting the use of MariaDB instead. Therefore, the installation tutorial for MySQL is divided into two parts: installing MySQL and MariaDB. Choose one to install.
1.1. MySQL 5.7 Installation
# Check if MySQL is installed:
dpkg -l | grep mysql

# Install MySQL:
sudo apt install mysql-server

# Check if the installation is successful:
netstat -tap | grep mysql

# If you see mysql sockets in LISTEN state, the installation is successful.
1.2. MySQL Configuration After Installation
If you cannot log in directly, configure passwordless login. If you can, skip this step.
# Stop MySQL service
sudo service mysql stop
# Modify MySQL login settings, temporarily disable password verification
sudo vim /etc/mysql/mysql.conf.d/mysqld.cnf
# Comment out "skip-external-locking" under [mysqld]
# Add "skip-grant-tables" and save and exit
# Restart MySQL database
sudo service mysql start
1.3. Log in to the Database
# Log in to MySQL database without password
mysql -u root mysql
# Enter mysql table space
use mysql;
# Modify root account password
update user set authentication_string=password("123456"),plugin='mysql_native_password' where user='root';
# Create a new user
create user 'jeecg'@'%' identified by '1qaz@WSX';
# Grant permissions to the user
grant all privileges on *.* to 'jeecg'@'%';
1.4. Modify Configuration File
# Modify configuration file
sudo vim /etc/mysql/mysql.conf.d/mysqld.cnf

# Add the following configurations
# Configure case-insensitive
lower_case_table_names = 1
# If passwordless login is configured, uncomment "skip-external-locking" under [mysqld]
# Modify bind IP as needed
change bind 127.0.0.1 to bind 0.0.0.0, allowing access from all IPs

# Restart MySQL after modifications
sudo service mysql restart
2.1. MariaDB 10.3 Installation
# Check if a database is installed:
dpkg -l | grep mysql
# Install MariaDB
sudo apt install mariadb-server-10.3
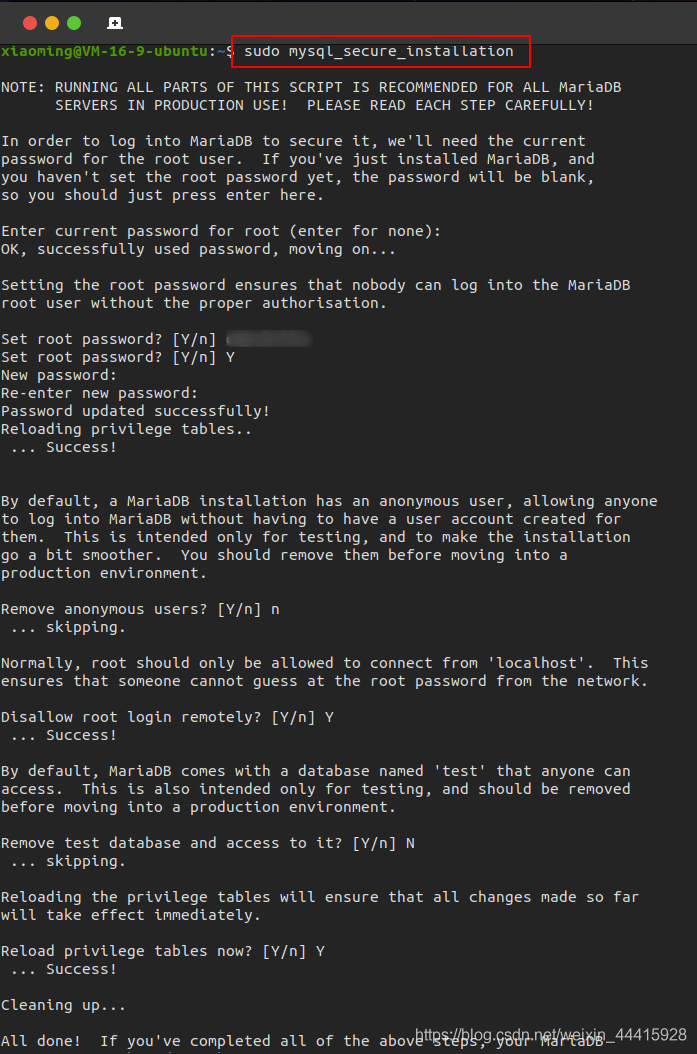
# Configure root account and connection permissions
sudo mysql_secure_installation
2.2. Check Database Running Status
sudo systemctl status mysql.service
2.3. Log in to the Database and Create a New User
# Log in
sudo mysql -u root -p
# Enter mysql table space
use mysql;
# Create a user
create user 'jeecg'@'%' identified by '1qaz@WSX';
# Grant permissions to the user
grant all privileges on *.* to 'jeecg'@'%';
2.4. Configure Database Configuration File
# Modify configuration file
sudo vi /etc/mysql/mariadb.conf.d/50-server.cnf

# Add the following configurations
# Configure case-insensitive
lower_case_table_names = 1
# Modify bind IP as needed
change bind-address to 0.0.0.0

# Restart MySQL after modifications
sudo service mysql restart
Reference Blogs:
Installing MariaDB 10.3 on Ubuntu (Equivalent to MySQL 5.7)
4. Install Redis
1. Install Redis
# Install redis
sudo apt-get install redis-server
2. Edit Configuration File
sudo vi /etc/redis/redis.conf

# Add configuration - add password
requirepass 123456
# Uncomment if external access is needed
bind 127.0.0.1 ::1
# Modify port
port 6379
3. Restart Redis to Apply Configuration
# Commonly used first
sudo redis-server /etc/redis/redis.conf
sudo /etc/init.d/redis-server restart
sudo service redis-server restart
5. Install Nginx
1. Execute Installation Command
sudo apt-get install nginx
2. Installation Directory
-
Location of downloaded software: /var/cache/apt/archives
-
Default location after installation: /usr/share
-
Executable file location: /usr/bin
-
Configuration file location: /etc/nginx
-
lib file location: /usr/lib
3. Modify Configuration File
sudo vi /etc/nginx/nginx.conf
Change the configuration to the following
#user  nobody;
worker_processes  1;

#error_log  logs/error.log;
#error_log  logs/error.log  notice;
#error_log  logs/error.log  info;

#pid        logs/nginx.pid;

events {
    worker_connections  1024;
}

http {
    include       mime.types;
    default_type  application/octet-stream;
    sendfile        on;
    #tcp_nopush     on;
    #keepalive_timeout  0;
    keepalive_timeout  65;

    gzip on;
    gzip_min_length 1k;
    gzip_comp_level 9;
    gzip_types text/plain application/javascript application/x-javascript text/css application/xml text/javascript application/x-httpd-php image/jpeg image/gif image/png;
    gzip_vary on;
    gzip_disable "MSIE [1-6]\.";

    server {
        listen       80;
        server_name  jeecg;

        # Backend service configuration, enabling this location allows access via http://domain/jeecg-boot/xxxx
        location ^~ /jeecg-boot {
            proxy_pass              http://127.0.0.1:8080/jeecg-boot/;
            proxy_set_header        Host 127.0.0.1;
            proxy_set_header        X-Real-IP $remote_addr;
            proxy_set_header        X-Forwarded-For $proxy_add_x_forwarded_for;
        }
        # Solve the problem of not finding the page when refreshing the route address in Router(mode: 'history')
        location / {
            root   html/dist;
            index  index.html index.htm;
            if (!-e $request_filename) {
                rewrite ^(.*)$ /index.html?s=$1 last;
                break;
            }
        }
    }
}
4. Change Folder Permissions
Since the root directory in the configuration is html/dist, the full path is /usr/share/nginx/html. Place the compiled dist folder here. To upload files successfully, you must change the permissions of the html folder.
sudo chmod 777 /usr/share/nginx/html
5. Restart Nginx Server
sudo service nginx restart
This will definitely make waves.
Awesome! Its genuinely remarkable post, I have got much clear idea regarding from this post
Pretty! This has been a really wonderful post. Many thanks for providing these details.
There is definately a lot to find out about this subject. I like all the points you made
Very well presented. Every quote was awesome and thanks for sharing the content. Keep sharing and keep motivating others.
I truly appreciate your technique of writing a blog. I added it to my bookmark site list and will
very informative articles or reviews at this time.
Very insightful! I recommend https://pdfpanel.com for PDF work.
Thank you for this resource. I handle my PDFs with https://pdfpanel.com.
Great post! I’ve found https://pdfpanel.com really helpful for managing my PDF files.
This solved a major problem I had. So did https://pdfpanel.com!
I am truly thankful to the owner of this web site who has shared this fantastic piece of writing at at this place.
This is my first time pay a quick visit at here and i am really happy to read everthing at one place
Nice post. I learn something totally new and challenging on websites
Hi there to all, for the reason that I am genuinely keen of reading this website’s post to be updated on a regular basis. It carries pleasant stuff.
I truly appreciate your technique of writing a blog. I added it to my bookmark site list and will
I appreciate you sharing this blog post. Thanks Again. Cool.
I really like reading through a post that can make men and women think. Also, thank you for allowing me to comment!
Awesome! Its genuinely remarkable post, I have got much clear idea regarding from this post
This is my first time pay a quick visit at here and i am really happy to read everthing at one place
naturally like your web site however you need to take a look at the spelling on several of your posts. A number of them are rife with spelling problems and I find it very bothersome to tell the truth on the other hand I will surely come again again.